開発
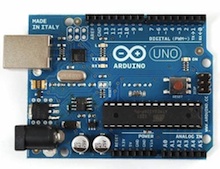
Basic Hardware Hacking with the Arduino Uno
Sean Wcisel
A lot of the most passionate developers I know will tell you that they first became interested in computers as a child because of a nagging curiosity about how they worked. There’s something about computers that makes them both wonderfully complex and yet extremely elegant. It calls to mind the Arthur C. Clark quote that you find scattered about our office, “Any sufficiently advanced technology is indistinguishable from magic.” It’s interesting that for many of us the drive to create that magic comes from many of the same personality traits that inspire us to demystify it. I’d like to present some features of the new Arduino Uno that make it very accessible even to new developers (really, hear me out!).
I’ll try to avoid simply restating information from the Uno’s webpage, but the documentation there is very thorough. If there are any important points I miss out on feel free to check out the site, leave a comment, or email me.
The Basics:
The Uno is a microcontroller board, which really just means it’s the “brains” of a hardware-based project. The price is generally around ¥3000, or $30 US (I picked mine up on ebay for around $20). Uploading code to the board is extremely easy to do using the Arduino software, which includes dozens of fully-functioning samples. This means that after plugging in the USB cable, you could have (extremely simple) working code on your device in under a minute. I know that sounds like a small victory, but for something as daunting as hardware hacking I’ll take what I can get!
The Hardware:
So, let’s talk about physical properties of the Uno. The first thing I noticed when I opened the box was how remarkably small the thing was. At only 2.7×2.1 inches (smaller than a credit card), the size of the board will rarely be an issue. The Uno has 6 analog input pins, and 14 output pins (6 of which are capable of pulse-width modulation, but that’s beyond the scope of this article). The on-board LEDs are obnoxiously bright, but I suppose I’d take that over not being able to see them any day. The board runs off either USB power or a 9 volt AC adapter, and supposedly it’ll auto-select between the two depending on which is available. An available 32k of storage is generally sufficient for most basic projects.
The IDE
 The integrated development environment, or IDE, for Arduino projects is great for beginners. The interface is simple and clean. A large amount of documentation is included in the software, meaning you won’t be completely helpless on the rare occasions where you don’t have internet access. I don’t really care for the actual code editor window, so I usually write the code in VIM and save the IDE for functions like uploading to the board and reading output. Code samples are very conveniently available in a drop-down menu, and they make excellent templates for other projects. The software is available for Mac, Linux, and Windows. Even better, the IDE is completely open source.
The Language
Arduino products use a unique subset of the C programming language. Those familiar with C-based languages will feel right at home developing for the Uno. I found myself using preproccesor statements like #define to help mitigate some of the language’s shortcomings. There are multitudes of code libraries out there to make life easier for developers. All Arduino programs require two functions, setup and loop. I know it’ll sound silly, but I was genuinely surprised at how easy it was to interface with the output pins on the board using the digitalWrite() function. The function takes two arguments, a pin number and the value to write. In my case, it only took roughly four minutes to throw together some extremely simple code to cause three LEDs to flash repeatedly in sequence:
#define PIN1 3

#define PIN2 5

#define PIN3 6

void setup()

{
setMode(PIN1, output);
setMode(PIN2, output);
setMode(PIN3, output);
}
void loop()
{
digitalWrite(PIN1, 1); // 1 = on, 0 = off
delay(1000); // wait 1000 milliseconds (one full second)
digitalWrite(PIN1,0);
digitalWrite(PIN2, 1);
…
}
The Community:
A major factor in my willingness to tackle any bit of technology is the community behind it. Fortunately, the Arduino forums are some of the most helpful and informative I’ve ever seen. In fact, the forums were so helpful that I eventually decided to forgo Google and just directly use the search bar on the forum site. Even the most esoteric questions seem to have been asked and answered in the forums, which saves a massive amount of time that would otherwise be spent troubleshooting. I can honestly say that the community is one of my favorite things about the Arduino family of products.
Conclusion:
I could probably go on a few more pages about the Uno’s excellent accessibility and flexibility, but even I wouldn’t want to read all that. I really encourage those of you who have even a remote interest in hardware development to look to Arduino products to help bridge that gap between hardware and software. Thanks for reading!
 2024/01/05
 2023/08/18
 2023/07/14
 2023/05/12
 2023/04/21
 2023/04/19
 2023/03/24
 2022/12/23
Nice write-up, well written and easy to follow. I’d be interested in seeing additional sample programs in the future.