開発
Images and scripting
denvazh
As far as I remember myself, I always tried to find something common in various activities and synchronize them (so that I don’t have to repeat same boring stuff again and again). For example, when you buy food you group it in a cart (or basket) and actually buy (you don’t buy items one by one). Sometimes its not even possible to do something without grouping certain activities, due to either time limits or other natural constraints (or both) . When I was at my hometown I wanted to meet most of my friends there, but if I wanted to meet them one by one it would take more time I had for entire trip, so again throwing a party (or some gathering at one specific place) helps in many ways.
I really enjoy the fact, that this approach is also true for stuff can be done with computers.
Currently I’m working on sets of images, which is used as frames for a movie. And usually when it comes to movies, there always huge amount of images that is necessary to be edited.
For this task many companies developed various GUI-based software. However, in my current work I work with it on the server side, thus there is no software and there are other constraints present.
One solution would be to pull this images somewhere and edit with some user-friendly tool, however to edit manually even 100 frames is a total waste of time.
More interesting solution would be to use command-line tools and write scripts that would to the trick. Let’s try it.
Assume we have two images made specifically for left and right eye (to combine it into a 3d image):
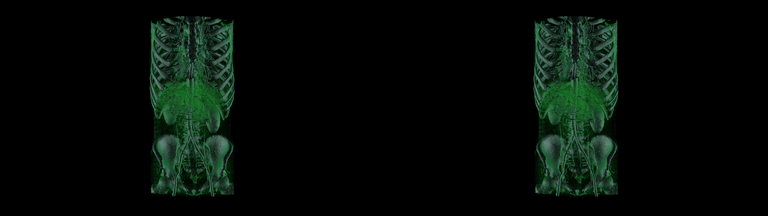
Using simple tools to test the basic algorithm for image processing, which will be used later in command-line scripts.
Manual image processing
First, let’s use something like Gimp to create 3d anaglyph image out of it in as simple as possible way. To do this we need to have two extra layers:
– filled with red color (R-255, G-0, B-0 or #FF0000)
– filled with cyan color (R-0, G-255, B-255 or #00FFFF)
For a right eye image we use red layer, and for the left – cyan.

Let’s combine them into a cyan/red anaglyph image!
Right eye image:
– put red layer on top of the right eye image
– select layer blend mode to screen
– merge

Left eye image:
– put cyan layer on top of the left image
– select layer blend mode to screen
– merge

Now we ended up with two layers and to finalize our effort lets select layer blend mode for the top layer to multiply. Result should look like this:
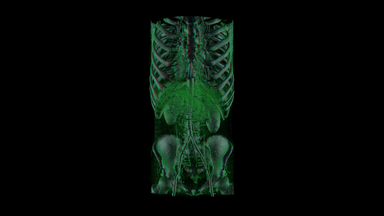
If you use 3d anaglyph red/cyan glasses you can enjoy 3d view of the image.
When editing one image it is enough to use this approach, however in case of frame series it is very nice to have command-line to which does the same job but for all images, not just one. There a number of tools available (for example python fu-scripts for gimp), however I would prefer to use Imagemagick for this kind of task. I like it because it is possible to write shell script wrapper to process certain series of images, or its even possible to use c or perl to have it as a part of a complex application.
Scripting
Let’s create anaglyph image the same way, but with a command line (assuming that we have images for left and right eyes stored in files left.png and right.png):
First, we need to know dimensions of original images:
# identify -format "%wx%h" right.png 1920x1080 # identify -format "%wx%h" left.png 1920x1080Note that its possible to control the output, and its convenient as soon as we will use it in this way in the next step.
Secondly, we need to create red and cyan filters with exact size as original images, for that we can combine it with previous command:# convert -size `identify -format "%wx%h" right.png` xc:#ff0000 red.png # convert -size `identify -format "%wx%h" left.png` xc:#00ffff cyan.pngNow we come to part, where we need control filter blend mode. Few words about how filters work in case of Gimp (more here). According to Gimp documentation:
– Basic relationship between layers: E = M + I , where M is a top layer which acts as mask, I lower layer. It means that for each pixel in the image colors from M is combined with colors from I to form resulting pixel color E.
– Screen mode: Screen mode inverts the values of each of the visible pixels in the two layers of the image. (That is, it subtracts each of them from 255.) Then it multiplies them together, divides by 255 and inverts this value again.
E = 255 – ((255 x M) x (255 x I)) / 255
– Multiply: mode multiplies the pixel values of the upper layer with those of the layer below it and then divides the result by 255. E = M x I / 255Imagemagick provides the same functionality as well. however you should write your own user defined mathematical compose method.
It expects all 4 arguments, “A”, “B”, “C”, and “D” which define the formula A*Sc*Dc + B*Sc + C*Dc + D, where Sc – is a source(or overlay) image and Dc is a destination(or background) image.So now, we can write necessary arguments to supply convert tool with:
– Screen: -1,1,1,0
– Multiply: 1,0,0,0Let’s go on and merge left and right images with corresponding color mask using knowledge above:
# convert right.png red.png -compose Mathematics -define compose:args='-1,1,1,0' -composite right_anag.png # convert left.png cyan.png -compose Mathematics -define compose:args='-1,1,1,0' -composite left_anag.pngFinally, we can merge these two images into anaglyph one:
# convert right_anag.png left_anag.png -compose Mathematics -define compose:args='1,0,0,0' -composite anaglyph.pngFinal result will be same.
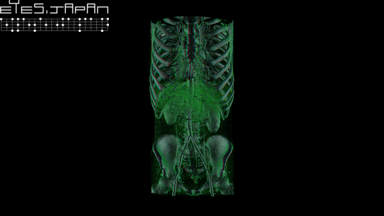
Additionally, to add company logo (stored as alpha image) to our resulting image we can use:
# composite \( -resize 10% ej_logo_alpha_white.png \) anaglyph.png ej.png
Note: it is possible to achieve exactly the same result with
# composite -stereo %left image% %right image% %resulting image%However it only outputs red/cyan anaglyph image. It cannot output green/magenta and blue/yellow images. In some cases its enough to have red/cyan, but in case you would want to have more control over the process and result, you should do all the steps manually.
Now, with a small effort we can write few lines of code to process entire directories! However, how to actually do this I would like to cover in future blog posts.
Conclusion:
Shell scripting along with advanced tools is a powerful asset to have, when dealing with activity you need to repeat over and over again on a huge sets of files.
- Tweet
-

 2024/01/05
 2023/08/18
 2023/07/14
 2023/05/12
 2023/04/21
 2023/04/19
 2023/03/24
 2022/12/23